SSL Pinning in Android
In this post I would like to explain how to do the SSL Pinnig from Android. First of all we will get a little idea about what is SSL and Pinnig means. In this post I did referred the OWASP(Open Web Application Security Project) page, where we can gain knowledge in common security risks of our software.
Mostly in client-server communication, we uses TCP/IP protocol. Based on TCP/IP there are application layer protocols, which are well known to the world(Such as HTTP, SMTP, FTP etc...) Widely used client-server communication protocol is HTTP. HTTP is an unsecured protocol and any one can interfere the communication between clients-server. Well know security risk in HTTP is Man-In-The-Middle attack, where attacker can read/update data inside a HTTP request/response. To overcome this kinds of attack HTTPS protocol is used, which will create a secure channel for client-server communication(This uses a X509 Certificate provided by Certificate Authority[CA] and asymmetric cryptography on data communication). Now will see what is pinning and why we need pinning. I have extracted the definitions from OWASP directly.
Step 03) Now you have all the .pem files and next step is to import all of them to a keystore file. Before doing the import, we need to configure the Bouncy Castle provider. For that use this link and download the bcprov-jdk15on-148.jar and place it in JDK/jre/lib/ext and JRE/lib/ext to configure provider. After that use below commands to import the certificates to keystore file. Keep in mind to change the "alias" for each entry.(KEYSTORE_NAME = "file name", KEYSTORE_PASSWORD="password you prefer and this will be used in Source code to open keystore")
Note : You can check the existing certificates inside the keystore file using following command.
Step 04) Add the generated keystore file to app\src\main\res\raw and update the STORE_PASS variable in MainActivity.java file.
You can find the source code in Github.
Mostly in client-server communication, we uses TCP/IP protocol. Based on TCP/IP there are application layer protocols, which are well known to the world(Such as HTTP, SMTP, FTP etc...) Widely used client-server communication protocol is HTTP. HTTP is an unsecured protocol and any one can interfere the communication between clients-server. Well know security risk in HTTP is Man-In-The-Middle attack, where attacker can read/update data inside a HTTP request/response. To overcome this kinds of attack HTTPS protocol is used, which will create a secure channel for client-server communication(This uses a X509 Certificate provided by Certificate Authority[CA] and asymmetric cryptography on data communication). Now will see what is pinning and why we need pinning. I have extracted the definitions from OWASP directly.
What is Pinning ?
Pinning is the process of associating a host with their expected X509 certificate or public key. Once a certificate or public key is known or seen for a host, the certificate or public key is associated or 'pinned' to the host. If more than one certificate or public key is acceptable, then the program holds a pinset . In this case, the advertised identity must match one of the elements in the pinset.
A host or service's certificate or public key can be added to an application at development time, or it can be added upon first encountering the certificate or public key. The former - adding at development time - is preferred since preloading the certificate or public key out of band usually means the attacker cannot taint the pin. If the certificate or public key is added upon first encounter, you will be using key continuity. Key continuity can fail if the attacker has a privileged position during the first encounter.
Pinning leverages knowledge of the pre-existing relationship between the user and an organization or service to help make better security related decisions. Because you already have information on the server or service, you don't need to rely on generalized mechanisms meant to solve the key distribution problem. That is, you don't need to turn to DNS for name/address mappings or CAs for bindings and status.
It is also worth mention that Pinning is not Stapling. Stapling sends both the certificate and Online Certificate Status Protocol (OCSP) responder information in the same request to avoid the additional fetches the client should perform during path validations.
Why Pinning ?
Users, developers, and applications expect end-to-end security on their secure channels, but some secure channels are not meeting the expectation. Specifically, channels built using well known protocols such as VPN, SSL, and TLS can be vulnerable to a number of attacks.
When and What to be pinned ?
You can pin at anytime, when need to be sure that communication happens with relevant host(you should probably pin all the time).
You can pin either Certificate or the Public key.If you choose public keys, you have two additional choices: (a) pin the subjectPublicKeyInfo; or (b) pin one of the concrete types such as RSAPublicKey or DSAPublicKey.
Now lets see how to do the SSL Pinning using Android applications to a known https client. For this example I have used "https://www.google.lk/" url. There are few basic stuff to be done before doing the SSL pinning. In this example I'm using a keystore file to save trusted certificates of google server and do SSL Pinning from that keystore file.
Step 01) Export the particular certificate from Certificate Information(In Firefox browser left corner of url. You can find it in below screenshot)
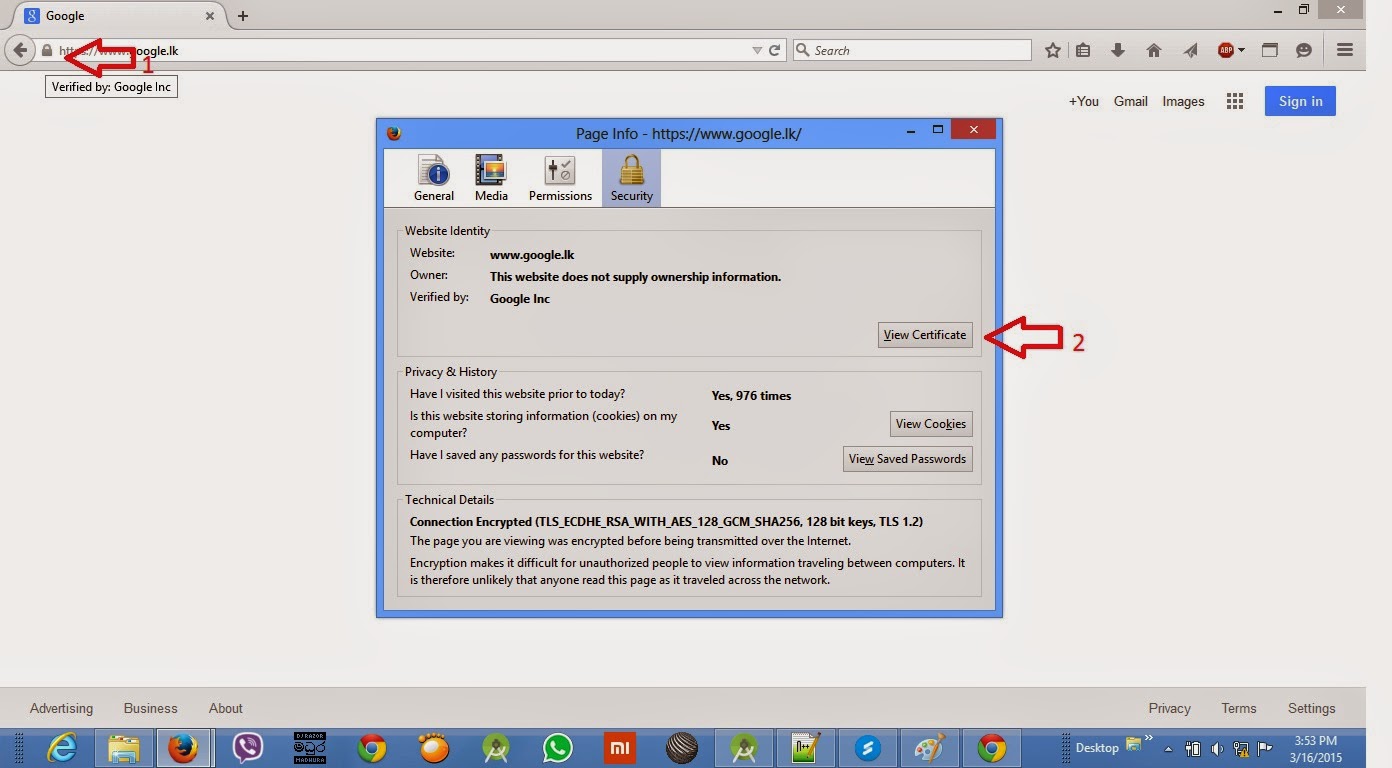
After clicking the "View Certificate", you can get the certificate details window. In that window "Certificate Hierachy" will indicate the hierarchy of the current certificate. Normally it can have 3 certificates, Certificate of CA, intermediate certificate and the actual certificate used to the google.lk for communication. We need to export all the certificates in this hierarchy to do the ssl pinning. You can export them by clicking "Export" in each certificate. By default it will be exported as .crt file. In this example I'm using 3 certificates for google.lk(root, intermediate and server certificate)
Step 02) As we have the certificates of the "https://www.google.lk/" we can use them to import to keystore file.
You can find the .crt files inside "certificates" folder in Github code. Certificates folder contains following .crt files.
Before importing we need to convert .crt file into .pem, use below command for that using openssl.
You have to create all the .pem files using above command.Now lets see how to do the SSL Pinning using Android applications to a known https client. For this example I have used "https://www.google.lk/" url. There are few basic stuff to be done before doing the SSL pinning. In this example I'm using a keystore file to save trusted certificates of google server and do SSL Pinning from that keystore file.
Step 01) Export the particular certificate from Certificate Information(In Firefox browser left corner of url. You can find it in below screenshot)
After clicking the "View Certificate", you can get the certificate details window. In that window "Certificate Hierachy" will indicate the hierarchy of the current certificate. Normally it can have 3 certificates, Certificate of CA, intermediate certificate and the actual certificate used to the google.lk for communication. We need to export all the certificates in this hierarchy to do the ssl pinning. You can export them by clicking "Export" in each certificate. By default it will be exported as .crt file. In this example I'm using 3 certificates for google.lk(root, intermediate and server certificate)
Step 02) As we have the certificates of the "https://www.google.lk/" we can use them to import to keystore file.
You can find the .crt files inside "certificates" folder in Github code. Certificates folder contains following .crt files.
GeoTrustGlobalCA.crt
GoogleInternetAuthorityG2.crt
googlelk.crt
Before importing we need to convert .crt file into .pem, use below command for that using openssl.
#Convert crt to pem
openssl x509 -in certificates/GeoTrustGlobalCA.crt -out certificates/GeoTrustGlobalCA.pem -outform PEM
Step 03) Now you have all the .pem files and next step is to import all of them to a keystore file. Before doing the import, we need to configure the Bouncy Castle provider. For that use this link and download the bcprov-jdk15on-148.jar and place it in JDK/jre/lib/ext and JRE/lib/ext to configure provider. After that use below commands to import the certificates to keystore file. Keep in mind to change the "alias" for each entry.(KEYSTORE_NAME = "file name", KEYSTORE_PASSWORD="password you prefer and this will be used in Source code to open keystore")
#Add all the certicates to keystore file. Use different "alias"
keytool -import -trustcacerts -alias root -file certificates/GeoTrustGlobalCA.pem -keystore certificates/key_store/KEYSTORE_NAME.bks -provider org.bouncycastle.jce.provider.BouncyCastleProvider -providerpath bcprov-jdk15on-148.jar -storetype BKS -storepass KEYSTORE_PASSWORD

keytool -import -trustcacerts -alias intermediate -file certificates/GoogleInternetAuthorityG2.pem -keystore certificates/key_store/KEYSTORE_NAME.bks -provider org.bouncycastle.jce.provider.BouncyCastleProvider -providerpath bcprov-jdk15on-148.jar -storetype BKS -storepass KEYSTORE_PASSWORD

keytool -import -trustcacerts -alias server -file certificates/googlelk.pem -keystore certificates/key_store/KEYSTORE_NAME.bks -provider org.bouncycastle.jce.provider.BouncyCastleProvider -providerpath bcprov-jdk15on-148.jar -storetype BKS -storepass KEYSTORE_PASSWORD
#Check the existing certificates list in keystore
keytool -list -keystore certificates/key_store/KEYSTORE_NAME.bks -provider org.bouncycastle.jce.provider.BouncyCastleProvider -providerpath bcprov-jdk15on-148.jar -storetype BKS -storepass KEYSTORE_PASSWORD
Step 04) Add the generated keystore file to app\src\main\res\raw and update the STORE_PASS variable in MainActivity.java file.
You can find the source code in Github.
Comments